
This week we like . .

Recipes and lots more . . (click to open)
After six years of writing about growing food, cooking it, self-sufficiency and life in general, there are 1,695 articles with 25,060 additional comments from hundreds of visitors.
In addition our community forum has 1,640 topics with 70,285 posts, contributed by like minded people. 24 categories ranging from food and frugality tips, to crafts and fabrics.
It all adds up to a big library of useful and enjoyable information, with some fun and amusing elements mixed in. After all, we have to laugh in the face of life’s adversities.
We hope you find what you are looking for and join in by adding to the store of practical knowledge.
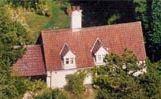
The New Cottagesmallholder HQ

This is a computer generated image of my new house. It has two bedrooms and a bathroom upstairs, downstairs there is a sitting room, a loo and a kitchen diner that overlooks a small garden. It even has an entrance hall! Unfortunately it will not be completed until the end of November 2024 but it will be worth waiting for as it is exactly what I was looking for. A few weeks ago I found a buyer for the cottage. She loves it – which makes it easier to let go and leave. This also meant that I had to find somewhere to move to. I...
read more
Valuable tip
People often arrive here looking for seasonal favourites.
To see what’s in demand right now, visit our Most Popular list.
It shows the most sought after recipes and topics of the past 7 days.